How to setup openFrameworks for Android on Windows
Notes
This is a tutorial on how to setup openFrameworks for Android on Windows. The current tutorial only explains how to do this using Linux or Mac OS X.
* update September 2012 *
My MinGW patches for openFrameworks 0071 are now merged into the develop branch of openFrameworks.
Last update: 11-09-2012
* update August 2012 *
I’ve fixed openFrameworks 0071 for MinGW on my branch (which will hopefully merged into the develop branch soon):
https://github.com/falcon4ever/openFrameworks/commits/develop-0071-android-r8b-mingw
Requirements
- Eclipse (with CDT plugin)
- Installed JDK (Java SE 7 Update 5) – I am using the x64 version but if you run into problems give x86 a try.
- Android SDK
- Installed ADT Plugin for Eclipse
- Android NDK (this tutorial uses r8b)
- Apache ANT
- Git/TortoiseGit
Setup environment
1. Install MinGW/MSYS
Install MinGW and MSYS according to this tutorial:
How to install MinGW, MSYS and Eclipse on windows
(Don’t forget to install the ADT plugin as well)
2. Setup SDKs and PATHS
After downloading the Android NDK, the Android SDK and Apache ANT, unzip them to the following locations:
C:\Development\android-ndk-r8bC:\Development\android-sdkC:\Development\apache-ant-1.8.4
If you used the SDK installer instead of the zip package, you might want to create a symbolic link to prevent issues with spaces in the path. Run cmd.exe as Admin:
cd\Development mklink /D android-sdk "C:\Program Files (x86)\Android\android-sdk" |
3. Setup JDK
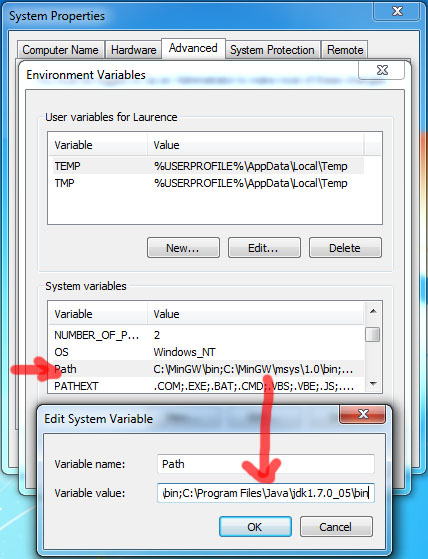
- Add
C:\Program Files\Java\jdk1.7.0_05\binto the PATH variable (if you are using a different version of the JDK, adjust the path accordingly)
- Set the JAVA_HOME system variable to the directory of your JDK installation:
C:\Program Files\Java\jdk1.7.0_05
4. Clone openFrameworks from Github
- Download openFrameworks (develop)
- I’ll be installing openFrameworks into:
C:\temp\OF -
git clone -b develop git://github.com/openframeworks/openFrameworks.git
5. Edit the paths.make file
- Find
paths.make.defaultin the folderopenFrameworks\libs\openFrameworksCompiled\project\android - Copy or rename it to paths.make
- Change the content to:
NDK_ROOT=C:/Development/android-ndk-r8b SDK_ROOT=C:/Development/android-sdk ANT_HOME=C:/Development/apache-ant-1.8.4 ANT_BIN=$(ANT_HOME)/bin/ |
If you use different versions, be sure to set the correct path!
6. Update the ofAndroidLib project
- Open up the commandline (start -> cmd.exe)
- Run:
C:/Development/android-sdk/tools/android.bat update project --target android-8 --path C:\temp\OF\addons\ofxAndroid\ofAndroidLib
7. Open Eclipse
- Workspace location:
C:\temp\OF\examples\android
8. Set eclipse java compiler compliance to 1.5
- Window > Preferences > Java > Compiler
9. Set Android SDK Location (optional)
- Window > Preferences > Android
- Enter:
C:\Development\android-sdk(Or use the one in program files) - It should list the Android 2.2 target, if not, use the Android SDK and AVD manager to install it.
Import the following projects (existing projects option in the import dialog):
C:\temp\OF\libsC:\temp\OF\libs\openFrameworksC:\temp\OF\addons\ofxAndroid\ofAndroidLibC:\temp\OF\examples\android
Note: You might want to turn off autobuild before adding these projects (Project > Build Automatically)
11. Switch to the C++ view
- Window > Open Perspective > Other > C++
- Select the openFrameworks project on the left
- Click the hammer icon (the triangle) to change the build target from Linux to Android
- Click the hammer icon to build the project (This might take a while to build).
C:\temp\OF\libs\openFrameworksCompiled\lib\androidIt should contain the following files:
- armeabi\libopenFrameworks.a
- armeabi\libopenFrameworksDebug.a
- armeabi-v7a\libopenFrameworks.a
- armeabi-v7a\libopenFrameworks_arm7.a
Manage run configurations
- Select a project on the left (e.g. androidPolygonExample)
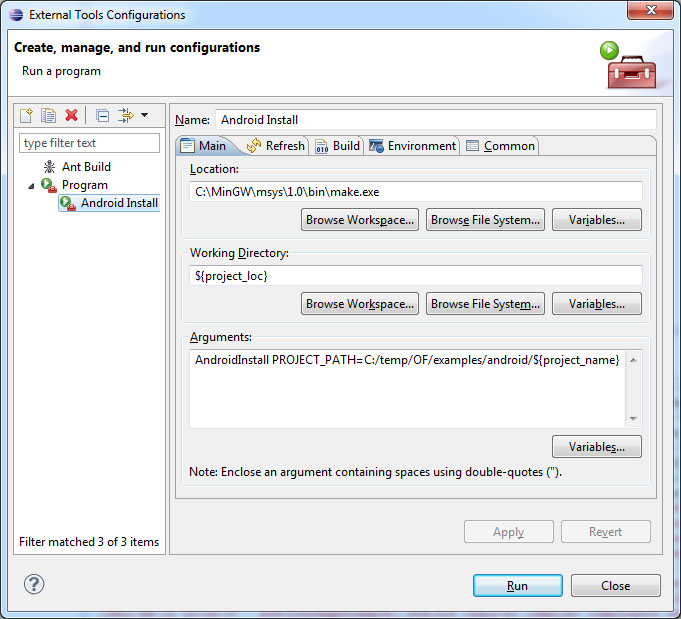
- Run > External Tools > External Tools Configuration
- The following dialog should now appear:
- Select program and press New, name the new configuration:
Android Install
- Location:
C:\MinGW\msys\1.0\bin\make.exe - Working Directory:
${project_loc} - Arguments:
AndroidInstall PROJECT_PATH=C:/temp/OF/examples/android/${project_name}
- Mark Refresh resources upon completion
- Select The selected resource
- Mark Build before launch
- Select The project containing the selected resource
- Mark Include referenced projects
Press Apply and Close
Running an example
- Connect your device
- Make sure that the device is recognized. You can do this by typing “adb devices” in the commandline (terminal)
(C:\Development\android-sdk-windows\platform-tools>C:\Development\android-sdk-windows\platform-tools\adb.exe devices) - Select an example on the left side
- Change the target to AndroidRelease
- Run > External Tools > Android Install
- Eclipse should start building the application and will transfer the apk file to your Android device (it will automatically launch the app).
- Done!
- Question: I’m getting an error about pkg-config when I try to launch the app (but it works fine)
- Answer: http://www.mingw.org/wiki/FAQ
- “How do I get pkg-config installed? The difficulty in getting pkg-config installed is due its circular depency on glib. To install pkg-config, you should first install the GTK-runtime, the installer is found at http://www.gtk.org/download/win32.php. The pkg-config binary can be obtained from pkg-config_0.23-3_win32.zip. Place pkg-config.exe in your MinGW bin directory.“
출처 : http://www.multigesture.net/articles/how-to-setup-openframeworks-for-android-on-windows/
'UTIL' 카테고리의 다른 글
| 두대의 컴퓨터에서 키보드 마우스 공유 - inputdirector (0) | 2013.04.20 |
|---|---|
| 키넥트 안드로이드 연결하기 (0) | 2013.04.13 |
| 안드로이드 컴퓨터로 작업하기 (0) | 2013.04.13 |
| 키넥트 개발 (0) | 2013.04.13 |
| 키넥트 컴퓨터랑 연결하기 xbox360 + windows7 (0) | 2013.04.13 |
